We build the first of the laminated arches for the chapel while other work continues
in the layout barn.

|
The weather has turned sharply colder and we have seen some snow falling. There's
a fire in the old wood stove and the shop is warm. It's a good day to work inside.
|
|
Richard and Will have finished the skeletal form for the laminated arch and Will
is applying the last of the top clamp plates. These plates form the uppermost portion
of the form. Holes drilled in each end of the plates are for the pipe clamps we
use to secure the laminated sections of the arch.
|

|

|
Travis Box, John's son, has just arrived at the timber shop with the first load
of boards for the arch. These boards were produced at our board planer by John's
crew and will become the laminations for the large laminated arches.
Ask a question:
Tell me more about the board planer.
|
John and Doug check the laminations to make sure they are within specification and
have been properly planed. This load passed inspection and was moved into the shop.
The crew has cleared the shop floor and are set up for the lamination process.
|

|

|
Will mixes the first batch of marine epoxy used as the "glue" that holds
the arch laminations together. We have experimented with many different glues and
have found that marine epoxy produces a very strong bond between the laminations.
The material can be difficult to work with and has a limited working time so the
crew must be well coordinated as you will see in the following pictures.
|
|
Will pours the first batch into the spreader pans. Notice the pale "salmon"
color of the mix. Both the epoxy resin and hardener are mixed in exact proportions
to produce this color, which when cured, is transparent and thus invisible when
looking at the side of the finished arch.
|

|

|
We apply the epoxy to both sides of the laminations using roller applicators. All
of the crew working with the epoxy wear protective gloves such as those worn by
Doug in this picture.
|
|
Keith is applying a thin layer of epoxy with the roller applicator. Notice how the
epoxy gives the board a glossy sheen. You can see all the pipe clamps staged in
the background for easy access once all the laminations are in place.
|

|

|
Jim and Travis begin layering the laminations across the top of the form. Travis
is aligning the material using guides placed on the back side of the form. This
is essentially the process until all of the laminations are in place.
We build laminated arches in two stages. This is the first stage and will produce
an arch 1/2 the final height. The final stage will be done in about 6 hours to produce
the full thickness of the arch.
|
|
Once all of the laminations are in place, Doug and Kevin fix the final guides to
the sides of the form. The guides hold the laminations in place during the clamping
process.
|

|

|
Pipe clamps are inserted through the plate holes and are used to pull the laminations
in place. The crew starts the bending process in the center of the arch and applies
progressive clamping pressure along the arch length on each side. End clamps are
applied, as seen here, to help the bending motion.
|
|
More clamps are moved into place and greater pressure is applied to produce the
bending motion along the length of the laminations. The crew works quickly and in
sync so that pressure is applied equally to both sides.
|

|

|
The ends are the most difficult as the bending pressure is greatest at this point.
You can see that Jim has pulled the end clamp down against the laminations compressing
all the boards together. Other crew members are moving over the clamps making sure
they have all been tensioned properly.
|
|
The first stage has been successfully completed and the laminated arch is an impressive
sight. The last set of laminations will be done about 6 hours later, after the epoxy
has had ample time to cure.
|

|
|
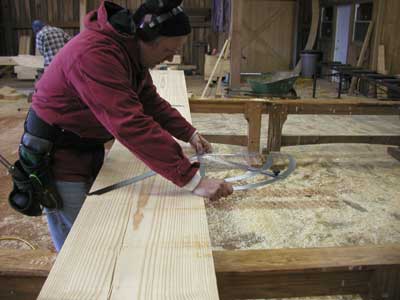
Meanwhile, out in the layout barn, Tim continues transferring the joinery details
to the chapel timbers. He is using a giant protractor to check the precise angles
where the arched sections meet the hammer beams.
|
We are working down the list of timbers for the chapel and there are a lot more
finished timbers than before. I can hear saws in the background and the not so subtle
thud as waste wood hits the timber shop floor.
There is a lot more to see in reports that will follow.
|

|