We fabricated a king post timber truss system for one of our clients to use in a
conventional home. The trusses will give the home some of the appearance of a timber
frame although the home is conventionally constructed. A truss system can be an
economical way to get the look of timber framing when budgets don't allow a complete
frame.
|
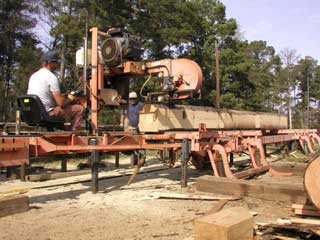
The timbers for the truss system were cut by John Box from select Southern Yellow
Pine logs delivered to Red Suspenders in October. The timbers were harvested by
Glyn Vines Forestry from land in Trinity County Texas. Typically, only a few trees
in any given area are suitable for timbers. These passed inspection with no problems.
|
|
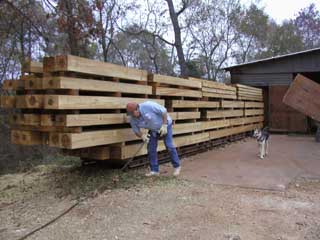
We were able to move the timbers into the kilns with another project we are doing
for a home in the Texas Hill Country. The timbers are near the middle of the load
you see here. All of the timbers in this run settled in at 17-19% moisture content
which is considered optimal.
|
|
|
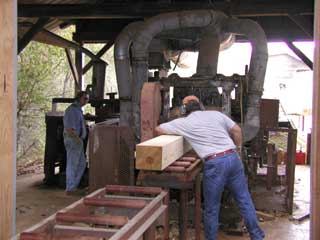
Once the timbers were removed and sorted from the stack, Doug Shaw and Richard Garwood
planed the timbers. Actually we call this sizing the timbers as it performs the
first dimensional planing and squares the timber prior to cutting the joinery. You
can learn more about drying and sizing elsewhere on our website.
|
|
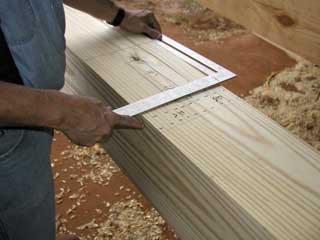
Richard can be seen transferring the plan dimensions of the truss to the timbers.
We call this process "layout". We "lay out" the joinery for
the other timberwrights in the shop to cut. These three timbers are the bottom cords
of the trusses.
|
|
|
You can see the layout marks on this timber face. This timber is one of the bottom
"cords". You can see the drawing for the center mortise cut where the
king post will set just under Richard's left hand toward the center of the picture.
|
|
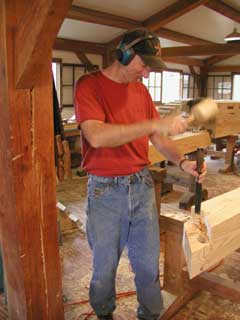
Keith Boen is cutting the tenon of a truss rafter. All six rafters will be cut in
the same manner. We use the old techniques for cutting joinery because it gives
us the best results. Mallets and chisels have been around for centuries.
|
|
|
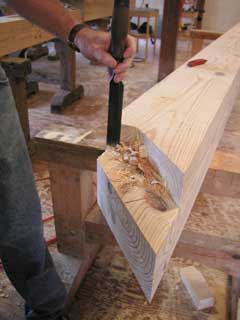
In this close-up view, you can see Keith working on the shoulder connection to the
king post and the markings for the remaining tenon. The red object you see on the
timber is a marker and not part of the wood!
This joint is not finished as yet. The lower portion of the tenon must still be
removed and contoured to fit the king post.
Remember that the king post is the center support for the truss system.
|
|
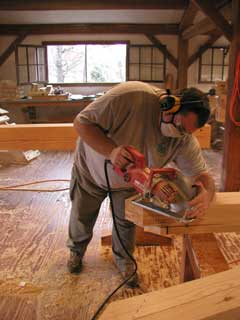
Will Howard is using a worm gear driven rotary saw to make the joinery cuts on this
king post. Saws are used to make the initial cuts but the final finishing of the
joint is always done by hand. Will should finish all of the initial cuts on your
king post today.
|
|
|
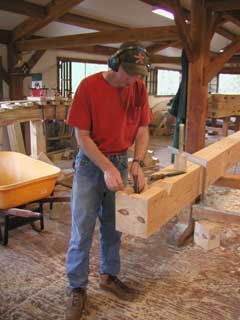
Keith is making the first joint on the first bottom cord. He is measuring the mortise
to make sure it is dimensioned correctly and is of the proper depth. We quality
check every step of the process to ensure everything will fit properly.
|
|
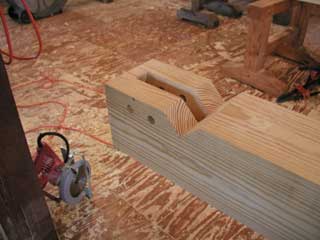
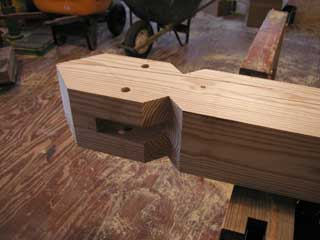
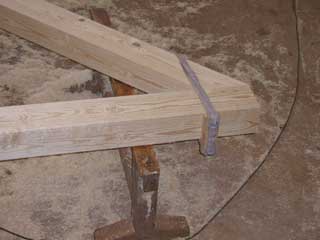
This is a close up of the joint Keith was working on and is the first finished joint
of a bottom cord. The deep "V" is where the rafter will fit. The face
of the "V" supports a portion of the rafter weight and locks the rafter
in place. The two holes are for wooden pegs which will be hammered in place once
the rafter is assembled to the bottom cord. The cutout between the peg holes is
called a mortise and is were the rafter tenon will go.
|
|
|
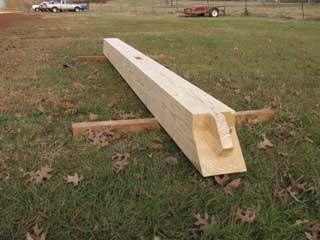
This is the first completed rafter. You can see the finished work Keith was doing
earlier. The mortis near the center of the timber is for the rafter to king post
brace. After the timber is cut, it will be stored in the Layout Barn until Richard
can check it one more time then apply the finished planing. We will not be applying
any additional finish to these timbers so that the customer can finish-match them
to his particular project.
|
|
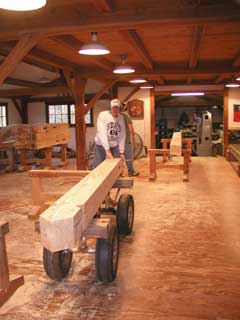
The first king post has been completed. Keith is rolling the post out to the Layout
Barn for testing the first assembly.
|
|
|
This is a close up of the joinery detail at the top of the king post. The deep "V"
cut is where the rafters will fit and serves to lock the rafters in place. These
cuts are called the bird's mouth... don't ask me why! You may also notice pencil
marks on the post face. All of these marks will be removed when the timbers are
finished planed.
|
|
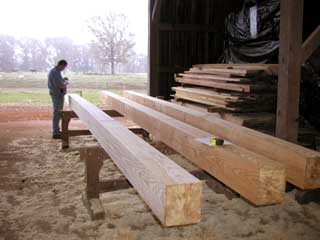
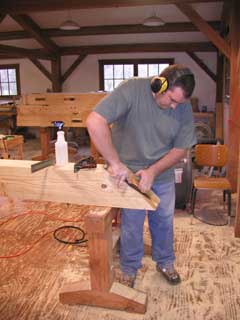
Will is hand planing the joinery face of this cord to ensure that it is perfectly
square with the timber sides and dimensioned correctly for the final joinery cut.
This is bottom cord number two of the three truss system.
|
|
|
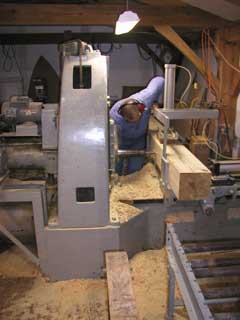
Kevin is doing the initial relief cuts on another King Post. We use this horizontal
milling machine to make the initial mortis cuts. This saves us a lot of time removing
excess wood from the joint so that the crew can finish the joint by hand.
|
|
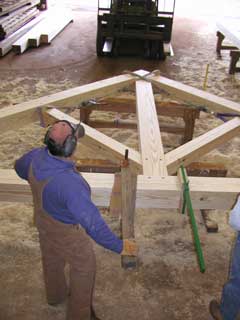
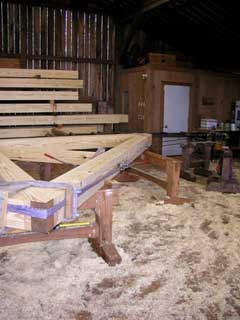
This is the first assembled truss. The levers at the bottom cord are used to ensure
the mortise and tenons are correctly aligned before drilling the counter bore holes
for the pegs. Notice that the truss is held together by "come-alongs"
so that all the joints are properly compressed together. Since we will be drilling
all of the peg holes, alignment at the job site is not so critical. When the peg
is driven home, it will draw the pieces together into proper alignment.
|
|
|
This is a view of the end joint detail. Although the contrast of the image is not
so good, you should be able to see how the mortise and tenon joint fit together.
Notice the strap around the end of the truss. It is attached to a come-along that
applies compression to this joint and the rafter king post joint. See the next image.
|
|
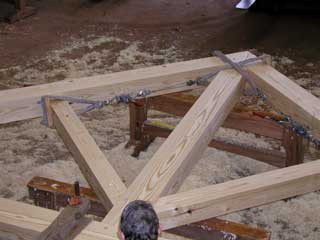
Here you can see the come-along and how it is attached to the king post. Other straps
and come-along arrangements can be see applying compression to the rafter/king post
joint.
|
|
|
Here is another shot of the brace/rafter/king post arrangement and the various straps
used to apply compression to the joinery prior to drilling the peg holes. When assembling
the truss, the bottom cord is the last to be installed.
|
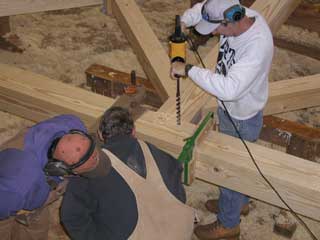
Keith is drilling the peg holes in the king post to bottom cord joinery. Doug and
Richard are holding tension on the bottom cord to ensure the timber sections remain
correctly aligned during the drilling process.
All of the trusses will be assembled, fitted and drilled in this manner before shipping.
|
|
When all the truss components have been finished, they will be grouped by component
(i.e. cords will be wrapped together) and banded for shipment. Each joint will be
annotated so that it is readily apparent which cord goes with which rafter and which
end attaches to which end. For example, A1 rafter joint is attached to A1 cord joint
both arrows facing the same way.