Shop work is in full swing, layout continues and John's crew is making the brace
stock for the frame. In this report we will look at how mortise joints are cut and
we will watch John's crew planing the brace stock.

|
Its early on a Monday morning but the coffee is hot and the weather will be nice
today so it's time to get started.
Teak the Wonder Dog is checking out the place to make sure everyone is "on
station" and you can see that we have already moved a bunch of timbers into
the timber shop.
Yes, the light upstairs means that Robert, Tim and Gene are also on the job!
|
|
The first step in cutting the joinery is to make the initial cuts for all of the
mortises. The machine Chet is using is know as Mr. Mortiser. It is actually a horizontal
milling machine that "relieves" the majority of the wood from a mortise
before it is finished by hand. You can see by all of the chips on the floor that
Chet has already done a bunch of oak timbers. Here is "blocking" a new
timber to make sure it is rigidly held and at the proper alignment to the milling
head.
|

|

|
In this close up, you can see where the milling head has removed most of the wood
from this particular mortise. If you look closely, you can see the "cut lines"
drawn in very light pencil marks. If you consider how many mortise cuts are to be
made in your frame, you can begin to appreciate the effectiveness of this machine.
It would be impossible for us to make any deadline if we had to remove all this
wood by hand.
Once the majority of the wood has been removed, the mortise is then finished by
hand using the traditional mallet and chisel.
|
The milling bit can not produce as accurate cuts as we can do by hand. Here you
can see Steve clearing out the bottom of the cut and squaring the sides with his
hand tools. The square you see in the foreground is used to make sure the mortise
is cut perfectly square to the timber face.
Every mortise joint in the frame will be finished in this manner.
|

|

|
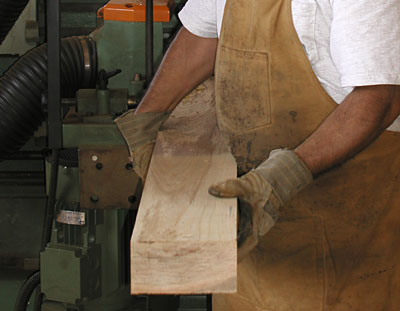
While the crew is working back at the timber shop, John and his crew are planing
brace stock. We use the smaller planner for braces as it produces an almost finished
surface and is very fast.
|
|
Mike and Victor alternate pulling the finished braces from the machine... it's that
fast. We have a lot of brace stock to plane so using this machine saves us about
a day and a half over what it would take with a smaller planer.
|

|
|
You can see in this close-up how the braces look after being run through the planer.
Once all of the braces are done, they will be moved to Brace Land where Keith will
lay out each individual brace just as was done for all of the post, girts and other
beams.
|
Richard and Keith match the timbers with the timber list to make sure we have everything
we need for your frame. There is still a lot of work ahead.
In the next report, we will look more closely at some of the other joinery being
cut for the frame.
|

|