Shop work is in full swing as layout moves into high gear and the first joinery
is completed.
|
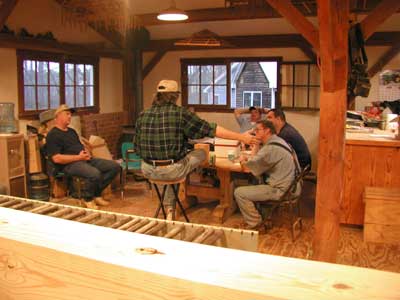
Before the crew starts a new project, we discuss the work to be performed and address
any safety issues that might come up. As we will be working with very large timbers,
we know that lifting and moving them will warrant extra consideration.
|
Every timber in the chapel will have some form of joinery cut into it so that the
frame can be joined together and raised onto the foundation.
Tim begins "laying out" the joinery. Layout is the process whereby we
transfer the physical dimension of each mortise and tenon directly to the timber
face. The "cut lines" are drawn in pencil to precisely follow the construction
drawings.
Layout will be done by several crew members. The layout of each timber is checked
for accuracy by a second crew members before any cutting on that timber begins.
Once a timber's layout is verified it moves into the cutting phase of the process.
|

|

|
Although the thin pencil lines drawn on the timber are impossible to see in this
picture, you should notice the black markings along the side of the timber facing
the camera. These markings were made by the "checker" who measured Tim's
work against the shop drawings.
If the joinery was laid out correctly, each cut line receives a black mark along
its length. If the layout disagrees with the construction drawings, the checker
corrects the error and the original layout person checks the changes.
|
|
Meet Mr. Kevin Koonce. Cutting mortises using our horizontal milling machine is
one of Kevin's specialties and it requires a great deal of patience and attention
to detail.
|

|
|

|
Here Kevin can be seen operating the horizontal milling machine we affectionately
call Mr. Mortise. You can think about this machine as very large router. We use
Mr. Mortise to make the initial mortise cuts in the timbers.
|

|
Mortise and tenon joinery is a very old form of carpentry whereby two timbers are
joined and held together using wooden pegs. Wooden joinery can be very strong and
when properly done, can last in service for centuries. By one count, there are about
700 different wooden joint configurations documented in existing timber frames throughout
the world.
The relationship between the tenon, mortise and pegs can be clearly seen in this
three dimensional drawing.
|
|
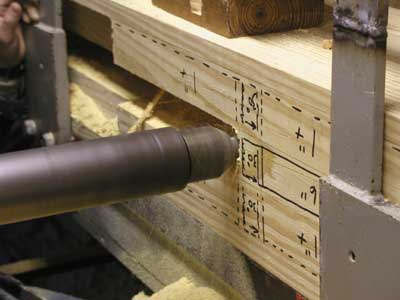
This is a close up of Kevin's work. Although they are very difficult to see in this
image, the thin pencil lines denote the actual dimensions he is following while
the black marks show that the layout has been checked. Notice how the router bit
has removed a large portion of the waste wood from the mortise.
|
|

|
This will be Kevin's world for the next several weeks as he completes the demanding
task of milling the waste wood from all of the mortise cuts used in the chapel timbers.
|
Meet Travis Horton. Travis is finishing a mortise by removing the waste wood Kevin
could not reach using Mr. Mortise. All of the joinery for the chapel will be finished
by hand using traditional tools such as those used by Travis. The "hammer"
is a mallet made of birch while the chisel is made of tempered steel and sharpened
to a razor-sharp edge.
Hand finishing allows us to square corners and add angled areas to a joint. It also
allows us to work to very tight tolerances that ensure tight fitting joinery. Even
in timbers as large as these we work to tolerances of less than 1/16th inch. Scaled
down to the size of furniture, the same allowable error would be about 2/1000th
of an inch.. We have not found any power tool that can equal the accuracy of a skilled
hand in large timber work.
|

|

|
Keith Boen, shop foreman, supervises the work being done in the timber shop and
inspects all of the joinery to verify that it conforms to shop standards.
|
|
Attention to detail is just part of the work. Each man is responsible for doing
his portion of the work accurately. Travis is checking the chase angle in this mortise
using a sliding bevel to make sure that the angle is correct.
|

|

|
Meet Mr. Will Howard. Will is holding one of the larger power saws we use in the
timber shop. Will's job, among others, is cutting the tenons at the timber ends.
|
|
Here, Will can be seen cutting the cheeks of an angled tenon with a large circular
saw. Nearly all of the waste wood for a tenon is removed with power saws but the
saw cut is kept slightly away from the pencil lines that describe the actual faces
of the completed tenon. Hand planes and chisels are used to bring all the joint
faces "to the line". Our standard practice is to split the pencil line
with the final pass of a hand tool.
|

|

|
Richard is moving the timber cart into position so that he and Tim can move the
next timber into position so that Will can begin work on the timber tenon. We are
well into production at this point as more timbers are moved into the production
process.
There is much more to come.
|