Tim and the crew are moving the frame work forward. Unfortunately, just after posting
report #6, we were hit by an unexpected surprise when our 1962 Cummings diesel engine
broke a lay shaft effectively putting the Yates Timber Sizer out of duty. We have
lost some production time because of the repairs, but Richard got the new parts
installed and operational today.

|
Robert is working on the structural insulated panel drawings which will be sent
to Murus so they can manufacture the panels used to enclose the timber frame structure.
Notice the computer monitor has the red oak frame displayed on the screen.
Our HP Plotter went down last Wednesday but we had it repaired and back up in time
for Robert to produce the drawings.
We've had a series of gremlins around the shop these last couple of weeks!
|
These timbers have already been cut to size and the joinery produced. Most of these
timbers are purlins while you can see a couple of girts and rafters in the image
as well.
The black streaks you see on the on the sides of some timbers are very typical of
red oak. Since red oak has a high level of tannic acid, anything made of iron or
steel that comes in contact with the oak will leave these black marks. The marks
you see were left by the blades on the Timber Sizer when the timbers were planed.
These timbers have yet to receive the final hand planing which will produce the
finished surface and remove these imperfections. However, since we will not be applying
a protective oil finish to the timbers in our shop, there may be some iron oxide
form before you can stain the timbers. If so, it should be easily removed with a
bit of finish sanding.
|

|

|
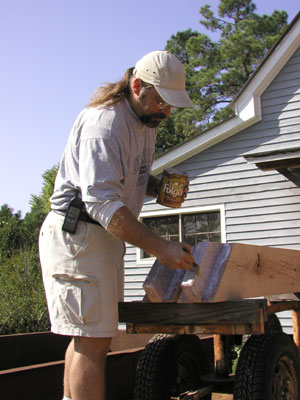
Before we look more closely at the joinery, notice that Steve is applying a white
material to the ends of these rafter tenons.
The material is actually a wax product that seals the end grain of the timbers.
Once a timber is cut, the end grain of the wood is exposed. This makes an easy channel
for moisture in to wood to escape which could change the geometry of the joinery.
The wax retards the drying process and thus stabilizes the joinery. We don't want
things to change too much before we actually assemble the frame in Pagosa Springs.
|
In this image you see mostly girts. The girts will span between post connecting
them together. There are several things to see in this picture.
First, the dark appearance of the joint is the wax Steve applied earlier to retard
moisture release.
Second is the way the girts are marked. Each timber has a specific place in the
frame and a specific designation so that we can find and install the correct timber.
The timber is identified as a girt VII going to a particular post with a particular
side facing up. It's really not as complicated as it may appear.
Third, notice that the shoulder joints (remember we saw those cut earlier) have
stabilizing blocks wedged into the shoulder cut. This is done to hold the slot apart
at the correct dimension so the splines will fit easily into the slot. If the slot
shrinks from drying before we assemble the frame, it would be difficult fitting
the girts onto the splines!
|

|

|
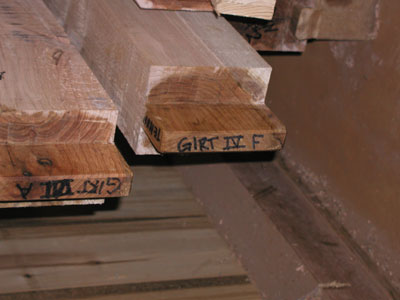
You are actually seeing this image rotated 90° to the left so that you can more
easily read the timber designation and see the way the tenon was cut.
Girt IV F uses a tenon to fit into post F on this side of the girt. If you
look closely, you will notice that all tenons (notice both examples) have beveled
edges on all sides. This is done so that when the tenon is inserted into the mortise,
it won't "plow" into the side of the mortise and gouge out the wood fibers
of the joinery and become stuck, before it is properly seated.
|
This is a diagrammatic representation of a typical mortise and tenon joint which
shows the relationship of the individual parts. The shoulder application you see
is a variation of the spline and housing used in your frame. Not all mortise and
tenon joints require housings or shoulders. It all depends on the type of forces
that will be applied to the joinery.
The pegs are oak and we use oak because it is particularly strong across the grain.
In this drawing, the forces most likely applied will be to place the girt in tension...
that is, pulling away from the post. This applies force across the grain of the
oak pegs which in turn transfers the force to the post.
It took me a long time to understand that most forces in a timber frame are either
tension (as above) or compression, which would be the downward force applied to
this post... that is, pushing down on the post.
|

|

|
These smaller timbers are purlins which will span between the bents. The joinery
used here is called the Dove Tail. It is a complex wedge that rest in a housing
cut into it's assigned girt. Once the joint is assembled, a small wedge is driven
between the dove tail and the housing that securely locks the joint in place.
|
|
This is just one stack of timbers ready for final finishing. There are a lot of
others about the timber shop and there will be a lot more by the end of the week.
|

|